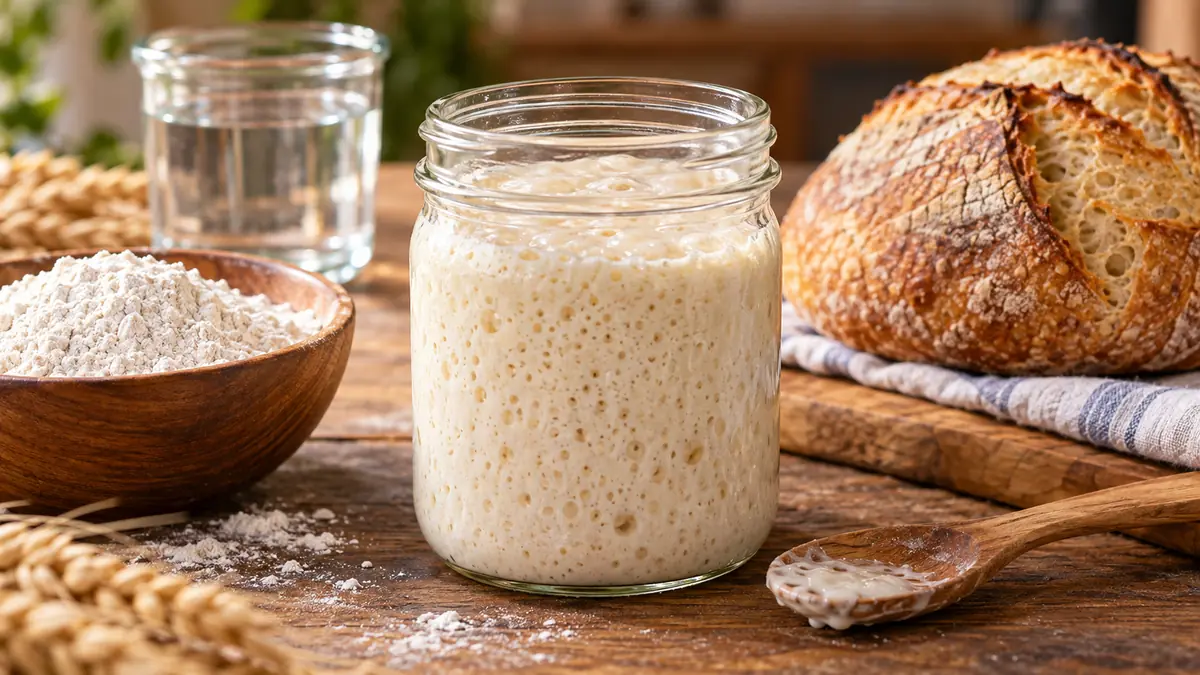
A sourdough starter can look intimidating when you first see jars bubbling on a baker’s counter. In reality, the basic process is surprisingly simple: flour, water, time, and regular feeding.
A sourdough starter is a living culture of wild yeast and lactic acid bacteria maintained with flour and water. Once established, it ferments fresh dough, helping sourdough bread rise while contributing its characteristic aroma, acidity, and flavor. A healthy starter can be maintained indefinitely with regular feeding.
You do not need commercial yeast, specialized equipment, or complicated ingredients to begin. What matters most is consistency and learning to judge the starter by its activity rather than expecting it to follow an exact calendar.
What Is a Sourdough Starter?
A sourdough starter is a fermented mixture of flour and water containing a community of naturally occurring yeasts and bacteria.
When flour is mixed with water, microorganisms begin using carbohydrates in the flour as food. As the culture develops, yeast produces carbon dioxide, while lactic acid bacteria produce acids and other fermentation compounds.
Those gases are responsible for the bubbles you see in an active starter and eventually help bread dough rise.
The acids contribute flavor and help create the environment associated with a mature sourdough culture.
A starter therefore serves two major purposes:
- Leavening: Yeast produces gas that helps dough rise.
- Fermentation and flavor: Bacteria and yeast create acids and aromatic compounds that give naturally leavened bread its distinctive character.
A starter is different from a levain. Your starter is the culture you maintain over time. A levain is typically a portion of that culture built specifically for a particular batch of bread.
What Do You Need to Make a Sourdough Starter?
You can begin with a very short ingredient list.
Flour
Whole wheat or whole-grain rye flour can be particularly useful when establishing a new starter. Whole-grain flour contains more of the grain and provides a nutrient-rich environment for fermentation.
Once the starter becomes established, unbleached all-purpose flour or bread flour can also work well for routine feeding.
The Perfect Loaf, for example, recommends using some whole-grain rye when creating a starter, while King Arthur Baking’s method begins with whole-grain flour and subsequently feeds with unbleached all-purpose flour.
You do not need to continually switch flours if your starter is thriving.
Water
Ordinary potable water is generally sufficient.
If your tap water works well for fermentation, there is no need to complicate things. Filtered water is another easy option.
Use room-temperature or slightly lukewarm water rather than very hot water.
A Container
A transparent jar or food-safe container makes monitoring activity much easier.
Straight sides are especially useful because you can mark the starter’s height immediately after feeding and see exactly how much it rises.
Your container should also have enough empty space for the starter to double or potentially rise even higher.
Digital Kitchen Scale
A scale is one of the most useful pieces of equipment for sourdough.
Flour can pack differently into measuring cups, whereas 50 grams is always 50 grams. Measuring by weight also makes feeding ratios much easier to understand.
You can still create a starter without a scale, but weighing ingredients generally produces more consistent results.
How to Make a Sourdough Starter From Scratch
There are many successful starter schedules, so do not be surprised if two reputable bakers give slightly different quantities or feeding frequencies.
The underlying principle is the same: combine flour and water, allow fermentation to begin, then repeatedly retain part of the culture and provide fresh flour and water.
The following beginner-friendly method uses a simple equal-weight feeding system.
Day 1: Mix Flour and Water
Combine:
- 50 g whole wheat or whole-grain rye flour
- 50 g water
Stir until there are no dry pockets of flour.
The consistency should resemble a thick batter or paste.
Transfer it to a clean container and loosely cover it. You want to prevent the surface from drying out without creating a completely sealed environment.
Mark the mixture’s starting level with a rubber band, marker, or piece of tape.
Leave it at room temperature for approximately 24 hours.
Day 2: Check for Early Activity
Look closely at the starter.
You may find:
- Small bubbles
- Slight expansion
- A different aroma
- No obvious change at all
All of these can occur during the early stages.
Do not assume your starter has failed because nothing dramatic happens during the first 24 hours. King Arthur notes that a starter may show some bubbling and growth at this stage or appear almost inactive.
Retain 50 g of starter and discard the rest.
Feed the retained starter with:
- 50 g flour
- 50 g water
Mix thoroughly, cover, mark its level, and leave it to ferment.
This is a 1:1:1 feeding ratio: one part starter, one part water, and one part flour by weight.
Day 3: Look for Bubbles and Expansion
By around the third day, many starters begin showing more noticeable fermentation.
You might see bubbles throughout the jar and detect a fruity, yeasty, tangy, or unusual fermented aroma.
Some starters also rise dramatically during these first few days.
Do not assume this early surge means your culture is fully mature.
A new starter can become extremely active and then appear to go quiet for several days. That slowdown can be frustrating, but it does not automatically mean anything has gone wrong.
Continue feeding rather than starting over simply because activity decreases.
For an increasingly active starter, you can move toward feedings approximately every 12 hours. King Arthur’s starter schedule switches to twice-daily feeding around this stage.
Days 4–7: Continue Feeding
Continue the same basic cycle:
- Retain 50 g starter.
- Remove the excess.
- Add 50 g water.
- Add 50 g flour.
- Mix thoroughly.
- Mark the starting level.
- Let it ferment.
- Repeat according to its activity and feeding schedule.
As fermentation becomes established, you should begin seeing more predictable rises after feeding.
The starter should gradually become bubbly and develop a pleasantly fermented, acidic aroma.
Do not treat Day 7 as a deadline.
Some cultures become vigorous within roughly a week, while others need considerably longer. Both King Arthur Baking and The Clever Carrot emphasize that conditions such as temperature can extend the process beyond seven days and sometimes into two weeks or more.
Quick Takeaway: Judge a sourdough starter by what it does after feeding, not simply by how many days old it is.
What Is the Best Sourdough Starter Feeding Ratio?
A useful beginner feeding ratio is:
1:1:1 by weight
For example:
| Starter | Flour | Water |
|---|---|---|
| 20 g | 20 g | 20 g |
| 30 g | 30 g | 30 g |
| 50 g | 50 g | 50 g |
| 100 g | 100 g | 100 g |
The actual quantity is less important than the ratio.
Keeping 20 g instead of 100 g, for example, can dramatically reduce flour waste while following the same basic feeding principle.
Higher feeding ratios such as 1:2:2, 1:3:3, or 1:5:5 are also commonly used with established starters. More fresh food relative to the amount of old starter generally means the culture takes longer to consume its available food and reach peak activity.
For someone learning the process, however, 1:1:1 is straightforward and easy to monitor. King Arthur uses equal weights of starter, water, and flour as its standard maintenance feeding.
Why Do You Have to Discard Sourdough Starter?
Discarding starter can initially seem wasteful.
Imagine starting with 50 g starter and continually adding another 50 g flour and 50 g water without removing anything. Your jar would rapidly become enormous, and you would need increasingly large quantities of flour to feed the expanding culture properly.
Removing part of the starter keeps its quantity manageable and ensures that the microorganisms receive an appropriate supply of fresh food.
King Arthur also notes that maintaining a controlled amount helps keep feeding conditions balanced.
Once your starter is mature and healthy, “discard” does not necessarily mean garbage.
Mature sourdough discard can be incorporated into recipes such as:
- Pancakes
- Waffles
- Crackers
- Pizza dough
- Flatbreads
- Muffins
- Quick breads
You can also maintain a very small starter to reduce the amount of flour used between baking sessions.
What Temperature Is Best for a Sourdough Starter?
Temperature has a major influence on fermentation speed.
A moderately warm kitchen generally encourages more rapid and predictable fermentation than a cold room.
King Arthur suggests an environment in roughly the upper 60s°F through the 70s°F for starter development, while The Perfect Loaf describes keeping a newly developing starter around 80°F/26°C as beneficial in its method.
The practical lesson is more important than chasing one exact temperature:
Warm starter = generally faster fermentation.
Cool starter = generally slower fermentation.
If your starter appears healthy but takes a long time to rise, temperature may be the reason.
Do not compensate for a cold kitchen by placing the jar somewhere excessively hot. Gentle, stable warmth is preferable.
How Do You Know When a Sourdough Starter Is Ready?
This is one of the most important questions for a new baker.
Do not decide based solely on bubbles.
Bubbles demonstrate fermentation, but an occasional bubble does not tell you whether the culture is strong enough to reliably leaven bread.
A much better benchmark is predictable expansion after feeding.
King Arthur considers a new starter ready when it consistently becomes very bubbly and approximately doubles in volume within about 6–8 hours after feeding.
Look for several signs together:
- Consistent rise after feeding
- Roughly doubling in volume
- Bubbles throughout the mixture
- A pleasant fermented or tangy aroma
- A recognizable rise-and-fall cycle
- Similar performance over repeated feedings
Consistency matters.
A starter that doubles once and then becomes nearly inactive is less dependable than one that repeatedly follows a predictable cycle.
What Does a Ripe Starter Look Like?
A freshly fed starter starts relatively dense.
As fermentation progresses, gas becomes trapped inside its structure. The mixture expands, bubbles become visible, and the surface may become slightly domed.
Eventually it reaches peak activity.
After exhausting much of its available food, it begins collapsing.
Learning this cycle—
feed → rise → peak → fall
—is far more useful than relying on the clock alone.
A ripe starter generally has visible bubbles, noticeable expansion, a fermented aroma, and a somewhat looser consistency.
Does the Float Test Tell You If a Starter Is Ready?
You may have heard of the float test: dropping a spoonful of starter into water and checking whether it floats.
Some bakers use it as a quick indicator of trapped gas.
However, it should not be treated as the only test of starter maturity.
A starter’s ability to float can be affected by flour type, hydration, how aggressively you scoop it, and where it is in its fermentation cycle.
Watching how reliably the starter rises after feeding gives you more useful information.
If your starter consistently doubles within a predictable period and displays strong fermentation activity, that pattern matters more than a single floating spoonful.
How Often Should You Feed a Sourdough Starter?
The answer depends largely on where you keep it and how often you bake.
If You Keep It at Room Temperature
A room-temperature starter remains metabolically active and therefore requires frequent feeding.
For an established starter, a daily feeding can work for many home bakers, while some schedules use approximately 12-hour intervals depending on the feeding ratio, temperature, and desired activity.
Watch the starter itself.
If it peaks and collapses long before its next scheduled feeding, you may need to change your feeding frequency or ratio.
If You Keep It in the Refrigerator
Refrigeration dramatically slows fermentation.
This makes cold storage convenient for people who bake occasionally rather than every day.
King Arthur recommends feeding a refrigerated starter about once a week as a straightforward maintenance schedule.
Before baking, bring the starter back to room temperature and give it enough feeding cycles to become vigorous and predictable again.
A starter that has been refrigerated for a long period may need several refreshments before reaching full strength.
How to Store a Sourdough Starter
Once your starter is established, choose a storage routine that matches your baking habits.
| Baking Frequency | Practical Storage | Typical Approach |
|---|---|---|
| Very frequently | Room temperature | Feed regularly |
| Weekly | Counter or refrigerator | Choose based on schedule |
| Occasionally | Refrigerator | Refresh before baking |
| Long break | Refrigerator/other preservation method | Revive before use |
For most casual home bakers, refrigerator storage is the easiest option.
Feed your starter, allow fermentation to begin, then refrigerate it.
When you want to bake, remove it and resume room-temperature feedings until it is active enough for your recipe.
What Is the Liquid on Top of My Sourdough Starter?
A neglected starter sometimes develops a layer of liquid.
Bakers commonly call this liquid hooch.
Its appearance usually indicates that the culture has consumed much of its available food and needs refreshing.
The liquid may range from relatively clear to gray or darker shades depending on how long the starter has been neglected.
A dark liquid by itself does not necessarily mean the starter must be discarded. King Arthur specifically notes that dark liquid can occur on a neglected starter and recommends feeding the culture, provided there are no spoilage indicators such as mold or pink/orange discoloration.
If your starter repeatedly develops liquid very quickly after feeding, reconsider its feeding schedule, temperature, or feeding ratio.
Why Is My Sourdough Starter Not Rising?
A starter that bubbles but refuses to rise is one of the most common beginner frustrations.
Several factors can contribute.
Your Starter Is Still Young
A new culture needs time to stabilize.
The dramatic activity of the first few days can be followed by a quieter period.
Continue feeding consistently.
Your Kitchen Is Cold
Fermentation slows as temperature drops.
A starter that might rise quickly in a warm environment can take considerably longer in a cool kitchen.
Your Feeding Schedule Needs Adjustment
If you repeatedly feed a sluggish young starter before it has had time to develop, interpreting its progress becomes difficult.
On the other hand, a vigorous starter left hungry for too long can peak and collapse before you check it.
Marking the jar after each feeding makes the rise-and-fall cycle much easier to observe.
Your Flour Has Changed
Switching flour can alter the starter’s texture, fermentation rate, and appearance.
Whole-grain rye and wheat behave differently from refined all-purpose flour.
A temporary change in activity following a flour change does not necessarily indicate failure.
The Starter Is Too Thin
A very liquid starter may ferment without showing a dramatic vertical rise because it cannot retain gas as effectively.
Using a scale helps maintain consistent hydration.
Why Does My Sourdough Starter Smell Strange?
A developing starter can produce a surprising range of aromas.
Depending on its age and feeding cycle, you may notice smells resembling:
- Yogurt
- Fruit
- Fermented grain
- Vinegar
- Alcohol
- Mild acetone or nail-polish-remover-like notes
Strong acidic or alcoholic smells often indicate that an established starter is hungry.
A healthy mature culture should generally settle into a recognizable clean, fermented, sour aroma.
A genuinely putrid smell combined with abnormal discoloration or mold is different and should be treated as a warning sign.
When Should You Throw Away a Sourdough Starter?
Starters are resilient, so temporary inactivity or unpleasant hunger-related aromas do not automatically mean you need to start again.
There are, however, clear situations where keeping the culture is not worth the risk.
Discard the entire starter if you see:
- Visible mold
- Pink coloration
- Orange coloration or streaks
- Obvious signs of spoilage
- A distinctly putrid odor
King Arthur specifically recommends throwing away starters showing mold, pink or orange coloration, or a putrid smell rather than attempting to revive them.
Do not simply scrape visible mold from the surface and continue using the remainder.
Start over with a clean container.
How to Revive a Neglected Sourdough Starter
If there is no mold, suspicious pink/orange discoloration, or putrid smell, an inactive starter may simply need food and time.
Start with a small amount.
For example:
- Retain 20 g starter.
- Add 20 g water.
- Add 20 g flour.
- Mix thoroughly.
- Leave it at a moderate room temperature.
- Watch for bubbles and expansion.
- Repeat feeding as activity returns.
If the starter begins rising reliably again, continue feeding until its behavior becomes predictable.
The longer it has been neglected, the more refreshments it may require.
A weak starter does not necessarily need a massive feeding. Consistent feeding under suitable conditions is usually more useful.
Can You Make Sourdough Starter Without Whole Wheat Flour?
Yes.
Whole wheat and rye are popular for starting cultures, but they are not the only options.
Unbleached all-purpose flour and bread flour can maintain healthy starters and are widely used for routine feeding.
Different flours simply produce different fermentation characteristics.
Whole-grain rye, for example, is popular because of its nutrient availability and fermentation activity, while white flour produces a lighter-colored culture and is convenient for everyday maintenance.
Once you have a healthy starter, experimentation becomes much easier.
Understanding Sourdough Starter Hydration
Hydration describes the amount of water relative to flour by weight.
A starter containing:
- 50 g flour
- 50 g water
has 100% hydration because the water weighs the same as the flour.
Do not confuse 100% hydration with a mixture that is 100% water.
It simply means the flour and water are present at equal weights.
A 100% hydration starter is popular because calculations are simple and the consistency is easy to work with.
Changing hydration can affect fermentation behavior, acidity, texture, and how the starter fits into bread formulas, but beginners do not need to manipulate hydration immediately.
Master a consistent 100% hydration culture first.
Common Sourdough Starter Mistakes
Most starter problems come from trying to control too many variables at once.
Measuring Flour and Water by Volume
A cup of flour and a cup of water do not weigh the same.
If you want a 1:1 flour-to-water ratio, measure by weight, not by volume.
Expecting It to Be Ready on an Exact Day
“Day 7” is a guideline, not a biological deadline.
Your kitchen temperature, flour, water, feeding schedule, and microbial environment all affect development.
Starting Over During the Quiet Stage
A burst of activity followed by several quiet days can occur while a new starter develops.
Patience often solves what appears to be a problem.
Feeding Huge Quantities
A healthy culture does not require a giant jar of starter.
Maintaining smaller quantities reduces flour consumption and discard without changing the underlying fermentation process.
Using an Airtight Container During Active Fermentation
Your container should protect the starter from drying out while allowing for fermentation and expansion. King Arthur advises covering the starter without sealing it completely airtight.
Ignoring Temperature
When everything else appears correct but fermentation remains extremely slow, check the temperature before changing the entire recipe.
Baking With an Immature Starter
Bubbles alone are not enough.
Wait for repeated, predictable rise after feeding before depending on your starter to leaven a loaf.
A Simple Sourdough Starter Routine for Beginners
Once your culture is established, sourdough maintenance becomes much less complicated than the first week makes it appear.
If you bake frequently, maintain a small starter at room temperature and feed it according to its fermentation cycle.
If you bake occasionally, refrigerate it and refresh it before baking.
For a simple room-temperature maintenance feeding, you could keep:
20 g starter + 20 g water + 20 g flour
That produces 60 g total starter.
Need more for a recipe?
Scale it up before baking.
For example:
50 g starter + 100 g water + 100 g flour
gives you 250 g of culture using a 1:2:2 feeding.
This approach means you do not need to maintain hundreds of grams of starter every day simply because a recipe occasionally requires a larger quantity.
Sourdough Starter vs. Commercial Yeast
Both can leaven bread, but they work differently.
| Feature | Sourdough Starter | Commercial Baker’s Yeast |
|---|---|---|
| Culture | Wild yeast + bacteria | Selected commercial yeast |
| Feeding required | Yes | No routine feeding |
| Fermentation | Generally slower | Generally faster |
| Flavor | Complex and acidic | Usually milder |
| Maintenance | Ongoing | Stored until needed |
| Bread style | Naturally leavened sourdough | Broad range of yeast breads |
Neither method makes someone a “better” baker.
Sourdough simply uses a maintained microbial culture instead of relying solely on manufactured baker’s yeast.
What Can You Make With a Sourdough Starter?
Bread is only the beginning.
An active starter can be used for naturally fermented:
- Sourdough bread
- Focaccia
- Pizza
- Baguettes
- Rolls
- English muffins
- Flatbreads
Discard can also be incorporated into many recipes where strong leavening from the starter itself is not required.
That flexibility is one reason maintaining a starter becomes more useful once you understand how to control its size.
How Long Can a Sourdough Starter Live?
Potentially for many years.
A starter is not a batch of dough with a fixed expiration date. It is a microbial culture maintained through repeated refreshments.
Each time you retain part of the existing starter and add fresh flour and water, you provide its microorganisms with another food supply.
The Perfect Loaf describes a properly maintained starter as a culture that can be maintained indefinitely.
Its age is less important than its current health.
A young starter that rises vigorously and predictably may perform better than an old starter that has been badly neglected.
The Most Important Rule for Sourdough Starter
Watch the culture rather than blindly following the clock.
Recipes provide useful schedules, but fermentation is biological. Your starter does not know that a recipe says it should double at exactly 8:00 p.m.
Learn to recognize:
how it looks immediately after feeding → how quickly bubbles develop → how far it rises → when it peaks → how it looks when it falls.
That pattern tells you much more than the starter’s age alone.
A successful sourdough starter does not require perfection. Start with flour and water, maintain consistent feeding conditions, keep the quantities manageable, and give the culture enough time to develop. Once it repeatedly becomes bubbly and roughly doubles within about 6–8 hours after feeding, you have a practical benchmark that it is strong enough to begin baking with.